Sunday, June 05, 2011

MODERN GIRL FTU

Written by Gwenda on June 5th 2011
Any similarity to any other tutorial is purely coincidental

You will need:

Font of choice – I used Freestyle script

Scrapkit by Bluedreams Designs called  I Am a Modern Girl. FTU found

Tube of choice. I used Tenia by Elias Chatzoudis. His work can be found at


Open new canvas 700 x 700 and floodfill white

Frame 1 – Resize 95%. Paste onto canvas. Adjust hue & saturation 245  136.
Duplicate, and on bottom copy go to adjust blur – Gaussian 10
Effects – texture effects – mosaic glass on default settings.
Dropshadow top copy only.

Frame 2 – Resize 95% then 97%. Dropshadow

Make gradient. Foreground #404040  and Background #fddacd 45 degree, 1 repeat.

Click inside frame 2 ( black one ), expand by 8. Layers – new raster layer and fill with gradient. Deselect.
Effects – textures – blinds with settings width 4, opacity 60, colour #cf637f. Horizontal unchecked.
Move above Gaussian layer.

Paste closeup of tube above top frame. Duplicate, and move one above the gradient layer.
Delete excess. Dropshadow top copy.

Phone – Resize 60% free rotate right 15. Sharpen. Dropshadow

Journal2 – Resize 80%. Free rotate left 15%. Sharpen, Dropshadow

Charm2 – Resize 70%. Dropshadow

Star2 – Resize 50%. Duplicate – mirror and move to the left. Dropshadow both

Add copyright.

If you choose not to animate, then add message to your phone and save.

TO ANIMATE:

Outline black screen of phone with selection tool. On palette layer, right click, and select “Promote selection to layer”. Deselect. Rename screen.
Adjust brightness & Contrast 100  5

FG Null, BG White, type message on screen. Convert to raster and free rotate right 15

OK – deep breath, mouthful of coffee . . . .

Open Animation Shop

In Photoshop, close off all layers from the phone up ( including the phone ), and the white background.
Merge visible. Rename “tube & frame layer”.

Close this layer, and re-open others.

Merge together the two stars, the charm and the journal layers, Rename this “top layer”

You should now have 6 layers, starting from the bottom:
White background
Tube & frame
Phone
Screen
Message
Top layer.

Make sure all layers are open.

Edit – copy special – copy merged. Go to Animation Shop and paste as a new animation.

Back in photoshop, carefully erase the LAST letter of your message.

Edit – copy special – copy merged and go back to AS. Paste BEFORE current frame.

Continue to do this until you have a blank screen in photoshop.

Close screen layer, so the black screen on the phone shows,

Edit – copy special – copy merged and go back to AS. Paste BEFORE current frame.

In PSP, open screen layer again and repeat above.

Repeat once more with black screen.

In As, Edit – select all – animation frame properties – display time 8. Click OK

Select Frame 2 -  animation frame properties – display time 30. Click OK
Repeat this step with frame 4

Select Frame 1 - animation frame properties – display time 15. Click OK
Repeat this step with frame 3

Click on last frame ( the one with all the words showing ) and set display time to 100.

Save as a gif, and you’re finished!!

Well done!


Monday, May 23, 2011

TROPICA FTU

Written by Gwenda on May 23rd 2011
Any similarity to any other tutorial is purely coincidental

You will need:

Font of choice – I used Mandingo, found

Tropical Dreams scrapkit by Fantasy Dreams Designzs FTU found

Tube of choice. I used Lena by Elias Chatzoudis. His work can be found at

Dropshadow as you go.

New Canvas 700 x 700 and floodfill white

FG Null. BG #f8b2cb or a colour from your tube
Draw preset shape. I used Altemus Borders 4q.
Centre on canvas and convert to raster.
Apply Xero fritillary  6   30   10   39.

Paste close up of tube and position as desired over shape. Set opacity at 70%
Click on fritillary shape. Selections – select all – float – defloat. Selections – invert. Click on tube and hit delete.
DO NOT DESELECT YET.
Click back on fritillary shape – selections – invert.
Selections modify – expand by 4
Layers – new raster layer. Fill with black.
Deselect.

Click on fritillary shape. Selections – select all – float – defloat. Selections – invert.
Click on black shape and hit delete. Deselect.  Dropshadow this frame.

Close white background and merge visible.
Re-open background.


El91 (ribbon vine) – Resize 95%. Free rotate left 90. Rename RIBBON 1
Duplicate – mirror. Rename this RIBBON 2
.
Duplicate Ribbon 2. Free rotate left 30. Resize 95%. Sharpen.
Rename this RIBBON 3.
Duplicate ribbon 3 – mirror. Rename this RIBBON 4

Duplicate ribbon 3 again. Rename this RIBBON 5
Free rotate left 30. Resize 95%. Sharpen, and move down.
Duplicate – mirror. Rename this RIBBON 6

Duplicate ribbon 2 again. Rename RIBBON 7.
Free rotate left 90. Sharpen, move down.
Duplicate – mirror. Rename this RIBBON 8.
Erase the bit sticking out to the left, and merge ribbons 7 & 8 to one layer.
Move this layer up above the shape. Dropshadow.

I went through and erased all the stalks sticking out the bottom at this point.

Close white background, shape, and ribbon 7&8 layer, and merge visible. Add dropshadow.
Re-open all layers.

Paste your main tube. Mirror and move to the right. Dropshadow

El72 (mouse) – Resize 40%. Mirror. Paste above shape layer, peeking out from behind tube. Sharpen & dropshadow.

El38 (pink flower) – Paste over background layer in top left corner. Duplicate – mirror and merge the 2 together.

Adjust blur – Gaussian 6

Add fritillary with same settings as before.
Move up to top.
Duplicate – flip and merge both together. Change opacity to 40% and re-apply fritillary.

El53 (flower stalk)  – Resize 60% then 70%. Free rotate left 45. Sharpen. Duplicate and resize this copy another 80%. Duplicate this once more and position as desired. Dropshadow

El96 & El97 (Butterflies) – Resize 50% twice. Mirror one. Sharpen.
(I didn’t dropshadow the butterflies)
Add any other embellishments of choice.

Crop & resize if desired.

Add copyrights and name.


Tuesday, May 17, 2011

SOUTHERN BREEZE FTU

Written by Gwenda on May 17th  2011
Any similarity to any other tutorial is purely coincidental

You will need:

Font of choice – I used Coventry Garden, FTU font found

Scrapkit called Southern Breeze
This a FTU kit from Horsin around with scraps

Tube of choice. I used Cameo by Jamie Kidd. This tube was purchased through CILM, but her work can now be found at
 CDO

Mask of choice – I used WSL349


Open new raster layer 700 x 700 and floodfill white

Layer – new raster layer – selections select all  - paste Paper 8 into selection. Deselect
Apply mask WSL349.
Merge group.

Copy & paste Doily 2 ( green)

Frame 4 – stretch sideways

Flower Doodle 3 – resize 75&. Place left. Duplicate and merge down.
Duplicate – Mirror

Flower Doodle 4 – resize 60%. Place right.
Duplicate. On this copy, use selection tool to select the 2 flowers. Deselect.
Mirror flowers and move to the right. Resize 90% and place as desired. Merge down to original flower doodle 4

Go back to Flower Doodle 3 and use selection tool to select a couple of flowers. Move these up the palette layer over flower doodle 4 and place to your liking.


Bow 2 -  resize 30% then 60% and paste into the middle of your canvas. Sharpen
Mura meister copies with the following settings. From top:
12   70   70   0   100   -25   100   0   100   0   0   30   0
Move so it sits between frame 4 and doily.

Click inside frame – expand 4. New raster layer under frame and fill with #efffd7 Deselect. Add texture of choice.

Tube – Position to liking over frame 4. Duplicate and drag under frame.
Click inside frame 4 – expand 4 – invert and delete on bottom copy of tube.
Deselect.
On top copy of tube, erase any excess.

Butterfly 2 – Resize 30%. Free rotate right 15. Sharpen.
Duplicate - Mirror

Add any other embellishments of choice.

Crop & resize if desired.

Add copyrights and name.


Saturday, May 14, 2011

RELEASE FTU

Written by Gwenda on May 14th  2011
Any similarity to any other tutorial is purely coincidental

You will need:

Font of choice – I used Pendulum, found

Scrapkit by Artmama called Anything Goes FTU found

Tube of choice. I used Release by The Vintage Angel. These beautiful tubes can be found at
 CDO

Mask of choice – I used WSL4


Dropshadow as you go

New raster 700 x 700
floodfill white

Layers – new raster layer. Selections – select all. Paste paper 7 into selection. Deselect
Apply Mask WSL 4. Merge group.

Embellie 03 – resize 80%. Free rotate right 45

Paper 05 – resize 70%. Paste under frame
Click inside frame with magic wand. Expand 8. Selections invert and click on paper layer. Hit delete. Deselect

Embellie 17 – resize 75%. Place top left over white background layer. Duplicate – mirror - flip

Embellie 16 –Free rotate left 45. Place over frame at left. Duplicate – mirror - flip

Embellie 20 – resize 60%. Free rotate left 45. Place under embellie 16 at left. Duplicate –flip. Merge both together.
Duplicate – mirror.

Embellie 13 – resize 70%. Paste under paper layer on left. Duplicate –flip. Merge both together.
Duplicate – mirror.

Add tube as top layer. Duplicate, drag on top of paper.
On top copy, delete parts you do not want to show.

Add any other embellishments of choice.

Crop & resize if desired.

Add copyrights and name.


NATURE'S GLORY FTU

Written by Gwenda on May 14th  2011
Any similarity to any other tutorial is purely coincidental

You will need:

Font of choice – I used Alba Matter, found

Scrapkit by Seachell called Canary Yellow FTU found

A nature background, or the one I am supplying

Tube of choice. I used Celestine by Elias Chatzoudis. His work can be found at
 PTE

Mask of choice – I used WSL4


New raster 700 x 700
floodfill white

Dropshadow as you go

Layers – new raster layer. Selections – select all. Paste paper 3 into selection. Deselect
Apply Mask WSL 4. Merge group.

Element 21 (frame) – resize 80%. Dropshadow
Click inside all 4 frames with magic wand. Expand by 3.
Layers – new raster layer. Paste Waterfall2 into selection. Deselect
Drop opacity to 84

Element 3 (vine) – resize 75%. Paste over frame at top. Duplicate and drag one under paper layer. Erase parts of top copy.
Duplicate – mirror – flip both copies so they are in the bottom left as well.

Element 29 (ribbon) – resize 45% Sharpen.
Paste over frame bottom left.

Element 21 (leaves) – resize 50% then 70% and paste under ribbon layer. Free rotate left 7.
Duplicate. Resize 85%. Mirror, and bring back to the left.

Element 4 (branch) – resize 60% twice. Paste bottom right

Element 2 (leaves) – resize 60% then 70%. Mirror and paste to left over frame.
Duplicate and resize 70%. Move down slightly. Duplicate again – mirror and bring back to left.

Element 32 (cage) – resize 60% then 80%. Sharpen.

Element 33 (canary) – resize 40%. Sharpen. Duplicate and move between the two element 1 layers so it is peeping out.
Duplicate again – mirror and move under cage layer.

Element 28 (yellow flower) – resize 30% then 60%. Duplicate and resize 85%

Element 10 (butterfly) – resize 30% then 60%. Free rotate left 15. Sharpen. Duplicate – mirror and place as desired.


Add main tube


Add any other embellishments of choice.

Crop & resize if desired.

Add copyrights and name.


Saturday, May 07, 2011

MADE WITH LOVE FTU

Written by Gwenda on May 7th 2011
Any similarity to any other tutorial is purely coincidental

You will need:

Font of choice – I used BrandyWine, found

Scrapkit by Jaelop called Made with Love FTU found

Tube of choice. I used Black Canary by Elias Chatzoudis. His work can be found at PTE

Mask of choice – I used WSL84


Open a new canvas 700 x 700 and fill white.

Paper 12 – resize 20%. Adjust Hue & Saturation 230  70
Layers – new raster layer - Selections – select all. Paste  Paper 12 into selection. Apply mask WSL84. Merge group.

Element 29 – Resize 25% and paste top left. Duplicate – mirror – flip.

Element 1 – Resize 5-% then 90%

Paper 1 – Resize 20%.
Click inside frame ( make sure you get right to edge of shadow ). Selections – modify – expand by 8
Layers – new raster layer. Paste paper 1 into selection. Deselect.
Sharpen

Paste tube over frame and move into position. Duplicate and move one copy under frame.
Erase on top copy, parts you don’t want seen.
Dropshadow top tube

Element 40 – Resize 30% and paste over frame at left. Duplicate and flip

Element 42 – Resize 25%. Paste left. Duplicate, free rotate left 9 and move down a bit.

Element 43 – Resize 20% then 85%. Duplicate and resize one another 85%

Element 44 – Resize 15% then 50%. Duplicate as many times as liked, and place as desired over elements 30 & 25. I resized a few another 85% as well

Element 28 – Resize 10% and paste over frame at left. Erase some so it looks as if it is weaving around frame (see mine for example)

Element 23 – Resize 30% then 65%. Free rotate left 90 and mirror. Paste over frame

Element 38 – Resize 20% then 85%. Free rotate left 25. Sharpen & dropshadow

Element 37 – Resize 20% then 85%. Free rotate right 25. Sharpen & dropshadow


Add any other embellishments of choice.

Crop & resize if desired.

Add copyrights and name.


Tuesday, April 26, 2011

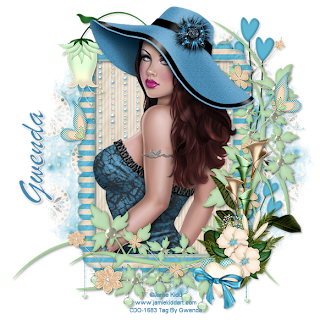
BLUE FTU

Written by Gwenda on April 26th 2011
Any similarity to any other tutorial is purely coincidental

You will need:

Font of choice – I used Brush script MT, FTU font found

Scrapkit called Flutterby Dreams
This a FTU kit from Wicked Princess Scraps and can be found

Tube of choice. I used Blue Bird by Jamie Kidd. Her work can be found CDO

Mask of choice – I used WSL75


Open new raster layer 600 x 600 and floodfill white


Layer – new raster layer – selections select all  - paste Paper 3 into selection. Deselect
Apply mask WSL75.

Cluster Frame – Free rotate left 90 then flip

Paste tube over frame as desired. Duplicate and move one copy below frame

With magic wand on point to point, draw selection around frame.
Layers – new raster layer and paste Paper 20 into selection.
Selections – invert. Click on bottom tube and hit delete.
Deselect.

Move paper layer below bottom tube. Go to effects – texture effect – blinds with settings
Width = 6, opacity = 20 and colour #4987ae. Both boxes unchecked.

Bling rain – Resize 50% and paste over paper layer. Sharpen

Ball Dangle - Resize 60%. Paste under paper layer. Sharpen

Love wire – Resize 50%. Paste above ball dangle layer. Duplicate & resize 75%. Move down. Free rotate right 25

Teardrop flower – Resize 60%. Mirror and place over frame

Wireflower – Resize 50% then 75%. Paste over frame at bottom. Sharpen.
Duplicate and free rotate right 90

Callalily – Resize 75% twice. Mirror. Place to right
Duplicate. On top copy, erase the leaves. Mirror, resize 85% and move down.

Hibiscus flower – Mirror. Resize 50% then 75%

Double Heart – mirror. Resize 50% then 40%

Crumpled Flower – Resize 40% twice, then 80%. Sharpen. Place as liked over bottom vine of frame.
Duplicate, Resize 60% and place where desired.

Checkered Butterfly – Resize 35% then 75%. Sharpen. Duplicate – mirror.

Dropshadow all layers except paper & mask.

Close Background & mask, and merge visible. Centralize.

Open mask and stretch up, down and right.

Add any other embellishments of choice.

Crop & resize if desired.

Add copyrights and name.